Addition Reveal: Master Bathroom

How is it that it feels like we are in the thick of Summer, and at the same time school feels like it’s right around the corner?? Time definitely does not wait for us to spend our seasons how we would like, does it! For this reason I have been much slower to share finished rooms in our home than I had planned. As our kids get older Summertime looks different than how it used to - these young humans are now excitedly making their own big plans, like biking to 7-Eleven for slurpees with friends, or spending an entire day planning and executing a variety of trick-shots throughout the neighborhood. These are good days, they just involve me a little less. It’s an interesting balance as a Mom of older kids/young teens to be present and available to them, but not waiting around and watching your own life pass by.

I am incredibly thankful for the passions God led me to discover when I was a young Mom. It was such a time of revelation for me and one thing that came from it is this business I so enjoy! Helping others truly love the home they are in is a gift to my heart. It’s creative and connective, both which add so much color to this life!

Adding on to our home has been a steep learning experience. The number of decisions felt endless not too long ago! The master bathroom was a space I anticipated having a lot of detailed decisions to make, but in real time ended up not being as stressful as I thought. We had a loose idea of what we wanted the bathroom to feel like, and when it came time to decide on each element, that idea was really useful for basing each decision.

I wanted to use a variety of organic textures in this space so the room as a whole would just feel soft and peaceful. The stone tile floor and the wicker linen/towel cabinet were two elements I was most excited about and wanted to build around.

The vanity was a tough one because I was hoping to find something in natural wood. After a lot of research it was apparent that it just didn’t fit our budget, so I took a gamble and went with this matte black piece instead and absolutely love how it turned out! Keeping the remaining elements simple and understated maintain that soft, organic feel. I even sprayed the original yellow-gold hardware on the vanity black so it would just be visually simple and unfussy.

After spending 12 years not even being able to fit in our bathroom at the same time (literally - Matt and I are used to waiting outside the door for the other to be finished because it was the size of an airplane bathroom), this space is a new experience! Tremendously grateful for the opportunity to add this space to our home and to even enjoy the details that we got to pick together! Matt and I discovered we are both VERY decisive when we are tired of walking tile aisles, and that our capacity to look at tile is about 45 minutes. Hah!

I’m thinking our Rec Room will be the next to share on here! Another very collaborative project with Matt which makes it that much more special. Thank you so much for stopping by today! You make these finished projects that much more fun to celebrate.

Room links

Vanity
Vanity Faucets
Mirrors
Lights
Shower Tile (with gray grout)
Shower Faucet
Bathroom Floor (with white grout)
Wicker Cabinet
Wall paint: Snowbound by Sherwin Williams

Room designed by us, built by Veterans Next Mission

'Shire Green', SW

Hello, sweet friends! Well we are just barreling through the seasons here, aren’t we? Aspects of this new weird normal feel like a marathon, but I’m also getting seasonal amnesia - you know how sometimes when you’re driving and you end up back home but hardly remember how you got there? (this IS normal, ask around) That’s how the seasons are kind of feeling. The pandemic started when the weather was still cool in March, then we blew through Summer and are rounding the corner to Fall and the air is turning crisp. How’d we get here? I, for one, don’t intend to barrel through the Fall. I quite enjoy this season and we intend to take full advantage of all of its sweet gifts.

Since March work has increased, schools have closed, I released my Interior Design Starter Guide, and we finally started letting Albus upstairs to our bedroom level. Those are the highlights in a nutshell! In all seriousness, what has been hard about this season has also been met with all that is rich and precious about it at the same time. Life has been busy on an other worldly level, but at the same time there is nothing like being with my family to fill my cup. Gratitude has not escaped me and I know that is a direct gift from the Lord.

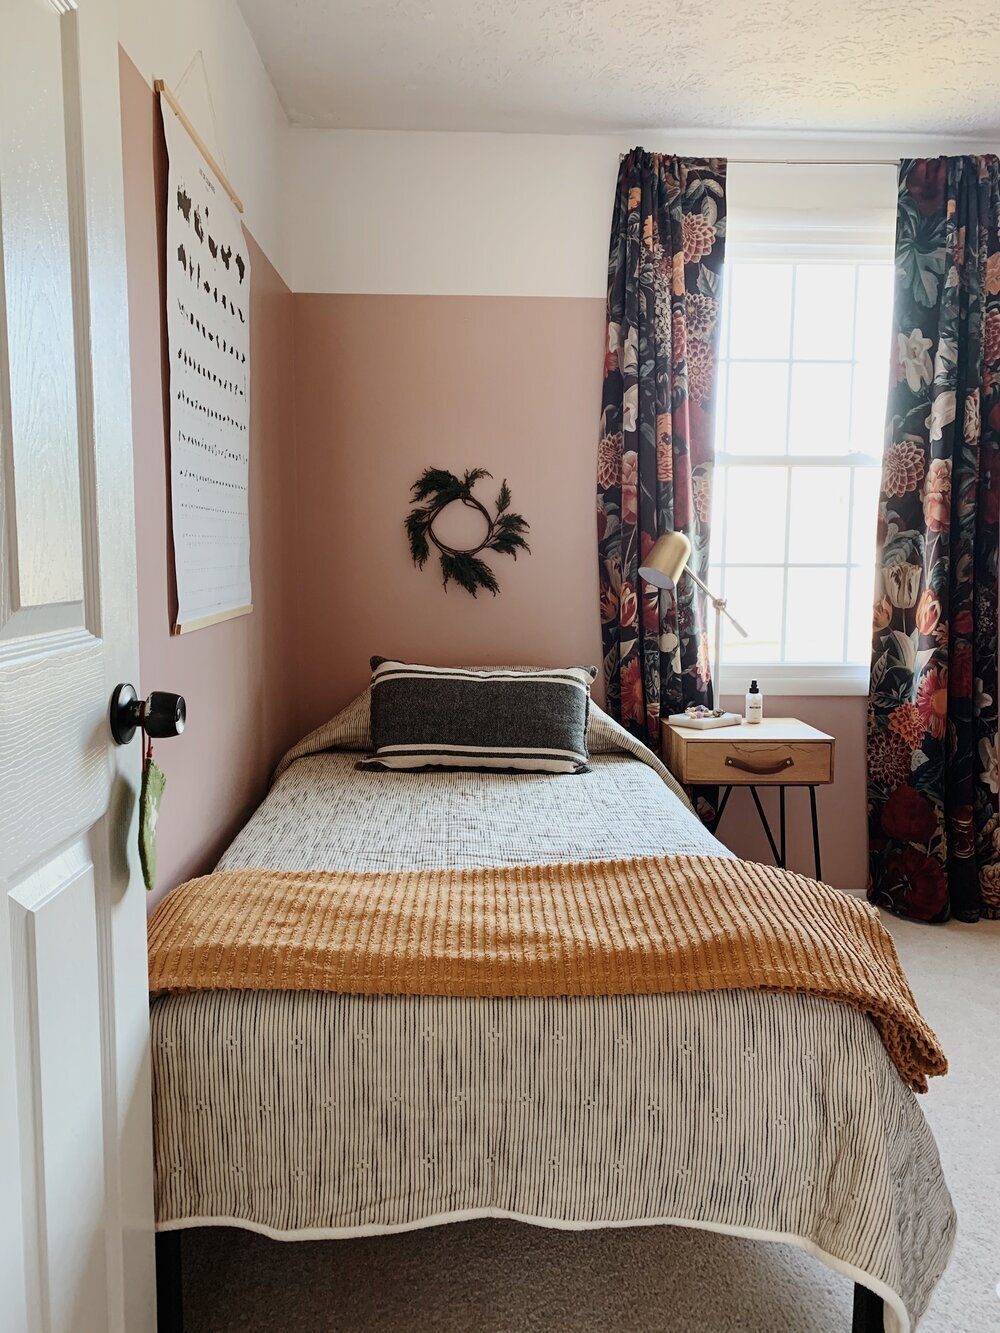
Towards the end of Summer Matt and I suddenly realized we had no established work spaces for our kids to do virtual school from this year. We thrust ourselves into creating functional desk areas in their rooms in time before the first day of school (yesterday!), and I’m relieved to share we got it done! It was a stretch, but done. Re-working Shire’s room to even make space for a desk was a challenge. But for me challenge and opportunity are synonymous and we really had a ton of fun! Since we were going to be moving things around I asked Shire if she wanted a fresh color which was an instant and surprising “YES!”

before.JPG

She’s loved her pink for several years, but she shares my curiosity and joy in creativity and wanted to try out green. After many swatches and samples, she ended up mixing two colors from Sherwin Williams and got to name it!

PicMonkey Collage.jpg

‘Shire Green’ is soft and minty with just a slight touch of gray. It’s perfectly dreamy; and so fun that our girl got to create it!

We went 3/4 the way up the wall, just like we did with the pink, but added vertical trim for some cozy texture and needed visual interest for such a light color. Before we added the trim it kind of just blended with the white, so I love that the trim work establishes the two colors.

5.JPG

Her bedding and curtains didn’t change, but it’s fun to see how the new color plays off both. Everything else in the room is new, new to us, built or on loan!

7.JPG

The light is a sweet borrow from Cate who used the pair in her master bedroom a few years ago and I love that it can bend out of the way when not in use!

12.JPG
10.JPG

Since Shire specifically requested her bed be placed in this nook (we were originally going to put the desk in the nook), we needed a slim nightstand solution, which Matt created out of scrap wood in our garage.

13.JPG
14.JPG

The desk is a piece we found at Target (linked here), and the chair I created from two Facebook Marketplace pieces I found, and the shelves….oh, those shelves. I really wanted corner shelves here so she could get as much up on shelves as possible, but it turns out the studs on this wall are every 24”, which didn’t work for your standard brackets. We found these horizontal brackets online (linked here), and while they ended up being the only possible way we could hang shelves where we wanted them, they felt like a visual eye-sore. Very garage-y looking. But honestly, as soon as I got her stuff up on them they grew on me!

15.JPG
16.JPG
19.JPG

That gorgeous mirror we’ll call a temporary trade - we loaned all our weight lifting equipment to my brother and Cate as soon as the gyms closed, and we got their mirror for when my sister was staying with us earlier in the pandemic. Weights for a mirror - not a bad deal! The dresser I am going to hold off on sharing because Shire and I have plans in place for the piece. She and I had searched all Summer for a refinishing project we could tackle together, and that cutie showed up just last week on FB Marketplace for a steal. It’s the perfect shape for our inspiration, (see here - of course, the project will be entirely dependent on our skills, so who knows where we’ll end up!)

17.JPG

Have you been cornered into updating any parts of your home during this time of COVID? Or simply taken on any refreshes in the name of creativity? Drop your project(s) in a comment below! Would love to hear what you all have been up to?

Thank you so much for stopping by!

Chelesa.jpg

Black Garden Green Thumb

To be perfectly clear, MATT has the green thumb. He comes from a long line of green thumbs, in fact! We’ve discussed growing our own veggie and herb garden for years but like many of you with your home projects, hadn’t gotten around to it until this quarantine! A silver lining to what’s going on, indeed. So in a matter of a week Matt was struck with instant motivation and after 13 trips to Home Depot, we were ready to build!

He knew he wanted to make a 8’x4’ raised garden, meaning above ground. Meaning no digging. (hooray!) Matt, our kids, my sister who is staying with us, and I all pitched in and we finished the whole thing in a weekend. To be honest with you, I had no intention of turning this project into a blog post, let alone covering how we did it. But after sharing an image of our garden in an Instagram story, I had several interested peeps ask if we were going to share how we did it. SO, without further adieu, StyleMutt Homes first how-to video tutorial! Thank you, Matt!

So there’s our process in a nutshell.And here’s our list of supplies linked for your reference:

Raised Garden Supplies:
-Weedblocker Fabric
-Hardware Mesh
-3” PVC Pipe, 10 x 12” pieces, (so we bought 5 x 24” sizes and cut in half)
-2x6x8 lumber, (need 6: 4 you will keep whole, 2 you will cut in half)
-1x2x8 lumber, (need 6: 4 you will keep whole, 2 you will cut in half)
-2x2x8 lumber, (need 6, which you will cut down to 36”)

Now for my very small contribution. The black! Turns out the best spot for our garden is the side of our house near the front, which is perfectly seen from the road and as you enter our neighborhood. Because it’s so easily seen I wanted it to look sleek, modern, and like an extension of our home, (which is white with black shutters). I knew after a year that the raw wood would start to look gray-ed out and old, which wouldn’t bother me if it wasn’t in such a prime and visual place! So I chose exterior black paint to give the outside of the box and surrounding fence an upgrade.

8.jpg

Here is where we started, for reference, and some images of our process:

20.JPG
23.JPG
22.JPG

I had to include this just for Matt’s beard - one week before caving in to a trim! Thank you, Lord!

19.jpg
1.jpg

As Matt indicated in the video all 4 surrounding wall panels are removable, so our access to the garden from any side is easy-peasy! We will store these panels in our garage during the off season.

7.jpg
6.jpg

And one more itty bitty detail of our garden is our homemade garden stakes.

I used air dry clay, (found here from Michaels), and formed the stakes. Then I used tiny metal letter stamps, (borrowed from a neighbor - thanks, Beth! I’ll return soon, I promise!), and printed the name of each plant. While I love the typed look of these, the letters are incredibly small. We made some of these for my Mom for Mothers Day, and Shire carved the name of the plants in with a toothpick, which also looked sweet.

17.jpg
18.jpg

I can’t wait to add some landscaping here and make it a happy and pleasant place to be, but we are already having so much fun with this garden. There’s something about gardening that feels like such an act of hope and trust. Our house feels too small most of the time and there is so much uncertainty with our future that feels dependent on Matt’s job. But we’re continuing to sow roots anyways. And why not? When it’s time to go, we will obediently go. But in the mean time we will continue investing in this home that has served us for the past decade.

Thank you so much for stopping by today!

Chelesa.jpg